Machine communication with Scalance S615 without gateway

Today I would like to show you how to set up a Siemens Scalance S615 firewall. This configuration allows you to access a plant network from a company network. You can do this without both networks having the Scalance entered as the default gateway.

Setup

PC 192.168.10.179 (VLAN 2 EXT) NO Gateway
SCLANACE 192.168.1.1 (VLAN 1 INT) and 192.168.10.1 (VLAN 2 EXT)
MACHINE 192.168.1.99 (VLAN 1 INT) NO Gateway

1. NETMAP

The PC communicates with 192.168.10.99 (Alias IP) from its own network, which is translated using a destination NAT. The machine behind this is 192.168.1.99.
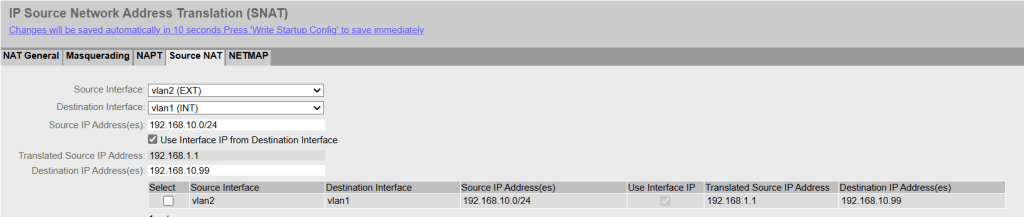
2. Source NAT

The machine thinks the packet comes from 192.168.1.1 (Source NAT) and can send a response packet without a gateway because it thinks the packet comes from the same subnet.

    3. Firewall Rule

    Don’t forget to set the corresponding entry in the firewall rules. „Auto Firewall Rule“ in the NETMAP can be helpful to automatically create an entry, but with a custom or customized entry the rule can be formulated more specifically.

    Terms

    Announce alias IP addresses

    • Sends a gratuitous ARP to announce the IP address.
    • This happens without an ARP request when creating NAT rules or rebooting the appliance.

    Alias ​​IP

    • NAT IP is registered on the source or destination interface.
    • CAUTION with entire subnets! In combination with „Announce Alias ​​IP addresses,“ each IP address is announced on the network with the MAC address of the router interface. This could produce a network outage.

    BIDIRECTIONAL Rule

    • Enters a second rule from the other direction.
    • This is important if the other side also wants to initiate the connection.

    Links 

    SCALANCE S615 Getting Started 

    SCALANCE S615 Web Based Management 

    NAT mit SCALANCE SC-600/ M-800/ S615 

    Dynamic Firewall Objects for AWS and Azure

    How to create a dynamic object with the public ip addresses used by AWS or Azure.

    • For standalone Firewalls SSH into the CloudGen Firewall
    • For managed Firewalls SSH into the Control Center Box Level

    Example command to create a dynamic network object with the IP addresses of the AWS EU-Central-1 region:

    # external-netobj-tool create Aws.Datacenters.Eu-central-1
    • The dynamic object is automatically updated every hour

    After creation it should look like this:

    Dynamic rule example
    Example of the dynamic object

    How to increase the Firewall Monitor history on a Barracuda CloudGen Firewall

    Issue

    Solution

    • Statistics database is stored in
      • /var/phion/appstat
    • Can be increased depending on available disk size
      • Different per appliance
      • Value 0 means automatic adjustment
        • No Barracuda Campus documentation found that describes the mechanism behind it
    • After the changes, keep an eye on the resources in the CONTROL tab
    CONFIGURATION > Configuration Tree > Box > Infrastructure Services > General Firewall Configuration

    DHCP-Relay auf Aruba Switches konfigurieren

    Config

    Der DHCP-Relay Agent ist per Default eingeschaltet und muss nur aktiviert werden falls in der Running-Config „no dhcp-relay“ sichtbar ist.

    HP Switch(config)# dhcp-relay

    Relay-Funktion am gewünschten VLAN konfigurieren und als IP-Adresse den DHCP-Server angeben. Zur Eingabe eines sekundären DHCP-Servers einfach den Befehl wiederholen.

    HP Switch(config)# vlan 1
    HP Switch(vlan-1)# ip helper-address 1.2.3.4

    Troubleshoot

    HP Switch# show ip helper-address vlan 1
    HP Switch# display dhcp relay statistics

    Debug

    Wireshark Capture Filter für DHCP Frames

    udp port 68 or port 67

    Unifi Controller Migration

    Methode A

    Migration-Wizard

    https://help.ui.com/hc/en-us/articles/115002869188-UniFi-Migrating-Sites-with-Site-Export-Wizard

    Methode B

    AP Handover

    1. Konfigurations-Backup importieren
      https://help.ui.com/hc/en-us/articles/204952144-UniFi-How-to-Create-and-Restore-a-Backup#3
    2. Am alten Controller: Neue Inform URL der Accesspoints konfigurieren

    Methode C

    Manual „Forget“ Migration

    1. Controller Installation über den UniFi Setup Wizard
    2. Discover-Methode zum neuen Controller umstellen (Zum Beispiel über DNS-Record)
      https://help.ui.com/hc/en-us/articles/204909754-UniFi-Device-Adoption-Methods-for-Remote-UniFi-Controllers
    3. Händische Migration der Access Points
      • Alter Controller => Devices => AP => Configure => Manage => Forget
      • Der AP setzt sich dadurch zurück, rebootet und findet dann zum neuen Controller
      • Am neuen Controller den AP adaptieren
      • Diese Schritte bei allen Accesspoints wiederholen
    Hinweis

    Um den Accesspoint zu „vergessen“ könnte dieser auch über die physische Reset-Taste oder über SSH auf Werkseinstellungen zurückgesetzt werden.

    https://help.ui.com/hc/en-us/articles/205143490-UniFi-How-to-Reset-Devices-to-Factory-Defaults

    Methode D

    Manual SSH Migration

    1. Controller Installation über den UniFi Setup Wizard
    2. SSH-Verbindung zum AP herstellen und auf Werkseinstellungen zurücksetzen:
      sudo syswrapper.sh restore-default
    3. Nach dem Reset erneut eine SSH-Verbindung zum Accesspoint aufbauen und danach die Inform URL konfigurieren:
      set-inform http://ip-of-controller:8080/inform

    AnyConnect Auto Connect Script

    AnyConnect Verbindung herstellen über Script unter Windows.

    ACHTUNG! Bei dieser Methode wird der VPN-Benutzer und das Passwort im Klartext auf der lokalen Festplatte gespeichert. Aus Sicherheitsgründen würde ich eine zertifikatbasierte Authentifizierung empfehlen.

    1. Textdatei mit Verbindungsdaten

    connect MYVPNGW
    Username
    Password

    2. Batch-Script

    @echo off
    set "host=192.168.1.1"
    
    REM Check if internal host is available.
    ping -n 1 "%host%" | findstr /r /c:"[0-9] *ms"
    
    if %errorlevel% == 0 (
        REM echo Success.
        REM echo CONNECTED - %time% %date%>> %TEMP%\anyconnect_script_log.txt
    ) else (
        REM echo FAILURE.
        taskkill /f /im vpnui.exe
        "%ProgramFiles(x86)%\Cisco\Cisco AnyConnect Secure Mobility Client\vpncli.exe" -s < %USERPROFILE%\myvpn.txt
        REM echo RECONNECT- Script executed at %time% %date%>> %TEMP%\anyconnect_script_log.txt
        start "" "%ProgramFiles(x86)%\Cisco\Cisco AnyConnect Secure Mobility Client\vpnui.exe"
    )

    Firepower Remote IP Change

    Wechsel der ISP Public-IPs für das Management- und Outside-Interface für Cisco Firepower Appliances mit FTD.

    1. FTD: SSH zur aktuellen Management-IP
      zum Beispiel mit Putty oder CLI "ssh admin@1.1.1.1"
    2. FTD: Aktuelle Netzwerkkonfiguration anzeigen
      show network
    3. FTD: Neue Management IP Einstellungen konfigurieren
      configure network ipv4 manual 2.2.2.1 255.255.255.248 2.2.2.6
    4. FMC: Die Management IP im Firepower Management Center ändern (1.1.1.1 => 2.2.2.1)
      Devices => Device Management => Edit
      Device => Management => Edit
    5. FTD: SSH zur neuen Management-IP
      zum Beispiel mit Putty oder CLI "ssh admin@1.1.1.1"
    6. FTD: Status überprüfen
      expert => sudo sftunnel_status.pl
    7. FMC: Neue Outside-IP konfigurieren
      Device => Outside-Interface: 2.2.2.2 => Deploy
    8. GEDULD! (Hat bei mir ca. 10min gedauert bis der Status im FMC und FTD wieder „grün“ war.)

    Cisco FTD Software-Update über CLI

    1. Patch mittels FTP auf die Firepower Threat Defense Firewall übertragen (LAN-Verbindung über das Inside-Interface, nicht das Management-Interface)
      > copy ftp://USER:PASSWORD@HOST/Cisco_FTD_Patch-6.4.0.8-28.sh.REL.tar disk0:
      
      Syntax error: Illegal parameter

      ACHTUNG! Bei meinem ersten Versuch den Patch zu übertragen, bekam ich eine Fehlermeldung. Ich glaube, es handelt sich dabei um einen Bug der FTD-CLI, da der Command zwar verfügbar ist, aber nicht funktioniert.

    2. Als Workaround in die ASA-CLI wechseln (LINA Engine)
      > system support diagnostic-cli
      MYFWL01# copy ftp://USER:PASSWORD@HOST/Cisco_FTD_Patch-6.4.0.8-28.sh.REL.tar disk0:
    3. In den Expert-Mode wechseln
      MYFWL01# exit
      > expert
      admin@MYFWL01$
    4. Patch installieren
      admin@MYFWL01$ sudo install_update.pl /mnt/disk0/Cisco_FTD_Patch-6.4.0.8-28.sh.REL.tar

      HINWEIS!  Ist die Firewall als HA bzw. Acitve/Standby Failover Cluster konfiguriert müssen beide Firewalls mit dem Failover-Link verbunden sein, da sonst die Patch-Installation fehlschlägt.

    Cisco ASA Passwort zurücksetzen

    1. Konsolen-Verbindung mit der ASA herstellen.
      – Entweder über das typische blaue „Cisco Console Cable“ (RJ-45) oder bei neueren Modellen mit USB (Mini USB Type B).
      – Als Software kann zum Beispiel Putty verwendet werden.
      – Den richtigen COM-Port findet man unter Windows im Gerätemanager.
    2. ASA neu starten (Stromkabel ausstecken und wieder einstecken).
    3. Kurz nach dem Start ESCAPE drücken um in den ROMMON Modus zu wechseln:

      Use BREAK or ESC to interrupt boot.
      Use SPACE to begin boot immediately.
    4. Configuration Register bearbeiten:
       rommon #1> confreg 0x41
      Update Config Register (0x41) in NVRAM...
    5. ASA neu starten:
       rommon #2> boot
      Launching BootLoader...
      Boot configuration file contains 1 entry.
      Loading disk0:/asa...-k8.bin... Booting...Loading...

      Durch das Setzen des Konfigurationsregisters auf 0x41 wird die Default Configuration anstelle der Startup Configuration geladen.

    6. Privileged EXEC Modus starten:
      ciscoasa# enable
    7. Bei der Passwortabfrage ENTER drücken. Das Passwort ist leer.
    8. Die Startup Configuration laden:
      ciscoasa# copy startup-config running-config
    9. In den Konfigurationsmodus wechseln:
      ciscoasa# configure terminal
    10. Passwort ändern:
      ciscoasa(config)# password PASSWORT
      ciscoasa(config)# enable password PASSWORT
      ciscoasa(config)# username name password PASSWORT
    11. Standard Konfigurationsregister laden:
      ciscoasa(config)# no config-register
      ciscoasa(config)# end

      Das Standard Konfigurationsregister ist 0x1 und kann mit dem Befehl „show version“ überprüft werden.

    12. Konfiguration mit dem neuen Passwort speichern:
      ciscoasa# copy running-config startup-config
    13. ASA neustarten:
      ciscoasa# reload